Layering Kit

I have my Simply Sixteen Mid-arm, which I love, which also means that I need to baste my quilting layers together.  I love my Kwik Clip for pinning, but I never could find it when I needed it so I spent as long looking for it as I did pinning my layers together.  I also have a couple of different spots where I layer my quilts, one requiring taping my layers, and the other is thin enough to hold my layers using binder clips.  Somehow, though, my clips would vanish, so i would go in search of them.  No more!

I now have made a layering kit!  It is terrific, because now that I have a dedicated container and spot in my sewing room, I no longer lose my supplies.  Yay!

20161023_102644

As you can see, I bought some variable sized clamps (which hubby is not allowed to touch), and have my roll of painters tape, my box of safety pins, and my Kwik Clip.  I always keep my pins open so that when I’m basting, I don’t need to waste time opening them.   Now when I need to baste a quilt,  everything is at my fingertips.

Sciency Stuffs

If I would have had my hubby as a teacher in high school, I may have liked science.  But science is not my cup of tea.  Doug teaches Physical Science for a virtual high school, and therefore teaches out of our home.  I can hear his lessons, and his love for teaching is evident in his lessons.  I never had a teacher that encouraged questions beyond the lesson, or that sang ditties to help remember facts.  My teachers were all rather stingy with praise, but generous with criticism.  Doug is the opposite, and finds the good in every possible way.

20160925_180032

When I went to the Madison Quilt Expo this month, I found the cutest science fabric and bought 3/4 of a yard for a pillowcase body.   This morning I plowed through my stash and found some nice fabrics to make a pillowcase for hubby’s big 6-0 Birthday in 2 weeks.

Today I wish that I had bought a couple of yards of the science fabric.  Oh well.  The pillowcase is made the “trickery” way so that no seams are exposed on the inside.  I love that way of making them.

A New Beginning-Again

Yup, another decision to actually work on my blog.  And to keep up with it, hopefully!

My passion is quilting.  I’ve been quilting for almost 4 decades, and this summer I finally purchased a “long arm” quilting machine.  Long arm is in quotes because technically I bought a mid-arm, but who am I to quibble?  I bought the Handi-Quilter Simply Sixteen with the 16 inch throat and the Little Foot frame.

Simply Sixteen

My new baby!


As you can see, I’m not a photgrapher.  People have asked me why I chose this machine, and here’s why:

  1.  Price Tag.  This machine is the most affordable one out there that comes in a frame…that I found.  Originally I was looking for a sit down machine, but decided that I would still have to manipulate lots of fabric even though it would have been easier than with my domestic machine.
  2.  Foot Print.  The frame is five feet wide, and fits in my sewing space.  I don’t have space available yet for a 12 foot frame!  I will in a couple of years when my grandson starts school (I babysit6 him full time).
  3. Versatile.  I can quilt everything from a wall quilt to a king sized quilt on this baby.  Do you remember the pvc hand quilting frames from years ago?  Well, this is that frame on steroids.  Yes, you have to layer and baste your quilt first (I pin baste), and I don’t love that job, but if I had bought a sit-down machine, I still would have had to baste my quilts.
  4.  Versatile.  Yup, again.  I can start on a quilt, get bored with it, load another one on, and then go back to my original quilt.  Can’t do that with a traditional frame!
  5. Versatile.  See that quilt in the photo?  I will talk about that later, but with this set up, I can do all of my quilting with thread color A, then change to color B, and do all of that.  Again, impossible on a traditional long arm frame.
  6. Stitch Regulator.  I probably should have put this nearer to the top.  You can buy an add-on stitch regulator for the sit-down machine, but then you’ve paid more for the whole set up than you would with this set up.  The regulator is built in, and to use it, you just touch a button on the touch screen.
  7. Upgradable.  Is that a word?  If someday I win the lottery (which I’ll need to start playing), I can upgrade this machine so it is completely computerized.  Hey, a girl can dream.
  8. In Wisconsin, we have a shop that sells long-arms, called The Quilting Connection.  They have two shops, on in Elkhorn, and the other in New London.  Let me tell you, service and knowledge is everything!  I had looked at a Juki mid-arm at a shop, and asked the sales girl some questions.  She didn’t know the answers and had to get back to me.  Not very confidence inspiring!  Sue and Angie from The Quilting Connection know these machines inside to out, backwards and forward and tricks to boot!  They don’t sell fabric or tons of notions.  They sell machines.  They teach on the machines, and will deliver and set the machine up for you.  They are available via phone, text and email for those ‘help’ moments. There was an issue that I had with the ruler quilting inset, and they contacted Handi-Quilter, and a replacement was sent to me asap.
  9. Hercules.  Really, I didn’t know this until after I bought the machine, but the whole set up is strong, secure and reassuring!  There is nothing flimsy about the machine or the frame.  I can lean on the frame and it doesn’t wiggle one little bit.  I needed to have hubby raise it for me, and the tools provided worked like they should, he raised the frame, and it all stayed level.  I know!  They did it right!
  10. Information.  There are tons of videos on how to use and troubleshoot everything on You Tube, and the Handi-Quilter website offers scads of information and help.

Well, in a nutshell, that is why I bought my Simply Sixteen.  I mentioned that I looked at a Juki sit-down.  I had also looked at the Janome sit-down machine at a quilt show.  The lady was determined to impress me with the upgraded version, which I had said I wasn’t interested in, and spent 5 minutes trying to get it to make one stitch. Really?  ugh!

In my next post, I will talk about how I am learning how to actually quilt.  Oh boy, is there a learning curve!


Crocodile Puppet

Grace is in love with Crocodiles!  She loves to play “chase” with her Papa as the crocodile, she loves Peter Pan’s crocodile, and she loves the ‘snap snap’ noise they make (with arms extended doing the jaw movement).  When I saw a dragon puppet on Pinterest, I knew I needed to make her a crocodile puppet!

Here is is!

ImageImage

Here is my inspiration: http://silvercharmster.wordpress.com/2008/10/08/am-i-a-designer/

I used Red Heart yarn, and an F hook.  I was surprised that it was so small, but in retrospect, I’m very glad that it is the perfect size for Grace’s 3 year old hand!  As you can see, she loved eating her mama’s arm (and everyone else’s arm)!

I followed the directions through most of the puppet, except for the eyes, and I deleted the ears.  For the eyes, I made two as follows:

Make a magic ring.  ch3.  Make 5 DC in ring.  Tighten ring and join in the top of the CH3.

2SC in each stitch around.  (12)  Join with slip stitch

2SC in first stitch, 1sc in next stitch.  Repeat around and join. (18)

2SC in first stitch, 1SC in next 2 stitches.  Repeat around and join. (24).

Leave a long tail, and thread it onto a yarn needle.  Sew around the circle, in one stitch and out the next, to create a “basting” stitch.  Pull the thread to form a ball, stuffing it tightly with fiberfill (or batting scraps).  Fasten off, leaving the tail to sew onto the puppet.  Cut a felt circle and whip stitch to the ball for the pupil.  Sew the eyes to the puppet.

Footprint

Well, I’m going to just have to accept that I am a sporadic blogger.  Try though I may, I never seem to get here to post all of the cool things I’m making.

However, here is a print that I made for my Son-in-law’s birthday.  The footprint is Graces, and is the actual size.  We printed her foot on a canvas, then I scanned it and entered it in Photoshop to manipulate it.  Love the texture the canvas brought to the print!  The background is a photo of one of his fields.  I applied a filter and reduced the opacity so that it wouldn’t overpower the tractor.  At the top of the layout, I placed a photo of Grace with her painted foot, and 3 photos of her enjoying farm life.

The layout, which is 8×8 inches, is going in a Scrapbook Page Holder that I got from Michael’s.  I just love this easel type holder that sits on a counter or bookshelf.  It is not only great for layouts, but for recipes!  I’m also thinking of having one as a calendar.Image

Crocheted Tupperware cover

I have a zillion topics to write about, but I’m going to this one at a time.

I love Pinterest.  I admit, I’m addicted.  I now do things that I wouldn’t ordinarily do because of Pinterest, like crochet a bunch of stuff.  I will get to the rest of these, but the first one I want to show you is this little container.  My daughter gave me a vintage (read: old) tupperware with no lid.  What to do?  I really try to not add to the landfills, and I love stuff to put things into, so I made this…

Yeah, photography is not my thing.  But it really is cute and useful.  The tupperware is one of those “lovely” burnt orange jobbies that originally had a star like lid that you pressed in the center.

I made this crocheted “vessel” from Ravelry, and it fit over the tupperware-snugly.  Then I added some vine, flowers, button centers and leaves, and now I have a cute container to carry more projects from room to room.

New Layout

I’m back with a quick post to show you my newest layout that I made for the Changing Ivy Challenge at Ivy Scraps.  I used the template provided by Designs by Gloria, and my kit, Cranberry Compote, and my daughter’s photos.  I just love this layout–ahhh, to be so carefree!

I thought about naming this “Little House on the Prairie”–doesn’t it remind you of the scenes at the beginning of the show?

Ivy Scraps has so many fun challenges!  Not only can you get some scrapping done, but many include freebies, and you can earn a free kit each month!  Can’t go wrong there!

I have a lot of things that I want to post about, but for right now, this is all I have time for.  I invite everyone to visit Ivy Scraps–I’m pretty sure it’s the friendliest site on the web!  Until next time…

Market Bag


I have to admit, I do love containers of all kinds…plastic, woven, fabric~if I can put stuff in it, I love it!  I have made a lot of tote bags, mostly quilted, but I wanted to make one from yarn.  I tried a couple of crochet patterns that I found on Pinterest, but ended up frogging 4 different ones before finding one that I loved-mostly.

This is the pattern that inspired me.  I made my first bag almost exactly like the pattern, except I wanted crocheted short handles, so I altered the pattern.  Long straps try my patience when I’m trying to grab the bag and the handle is twisted under this, that or the other-I usually end up dumping the bag trying to grab the handles!  So, using Cynthia’s pattern as a start, I created this bag:

Image

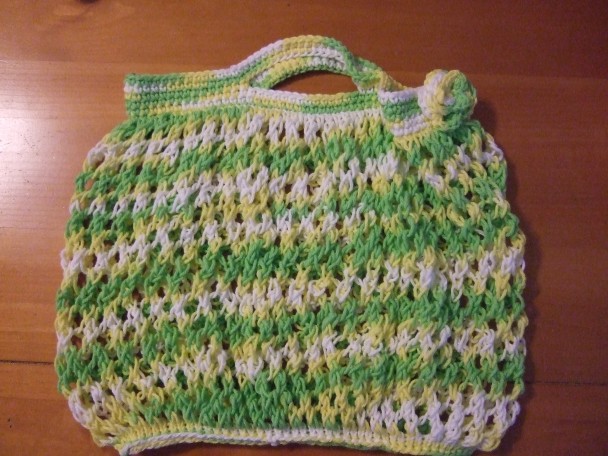
I used 2 skeins of cotton “dishcloth” yarn-this was Peaches and Cream Brand, and started at the bottom.  This is a wonderful market bag with lots of stretch!

I used Size 8 (16″) circular needles, Size 13 (16″) circular needles, and a G Crochet hook.  I have to admit that I’m not the world’s best crocheter, and that I tend to “wing it” to make it work.  My joins at the top are not stellar, so I added a flower to cover up that part. (That’s our little secret.)

To make this bag:

Using smaller knitting needles, cast on 88 stitches.

Place Marker at beginning of all rounds, and move up as you go.  Join, being careful to not twist stitches.

Knit 2 rounds.

Change to larger needles, knitting that round.

Mesh Pattern:  round 1:  Knit

round 2: * Knit 2 together, yarn over*  repeat until end of round

Knit these two rounds until bag measures about 11″.

Next round:  Knit this round, while switching back to the smaller needle.  (Be careful that your stitches don’t fall off of the smaller needles as you continue to knit onto the other end…this happened more than once, then I wrapped a rubber band around the end of the smaller needle to keep those stitches in place.)

On smaller needles, knit another round.

Next round:  We’re going to switch to crochet now…slip the first stitch from the needle onto your hook.Image

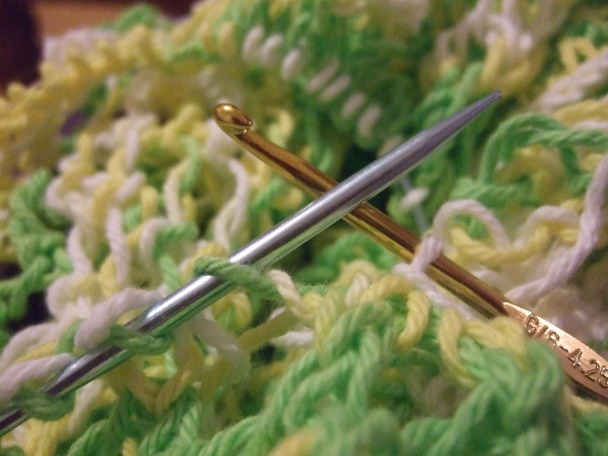
Now slide the next stitch onto your hook and off of your needle.  Using your working yarn, Image
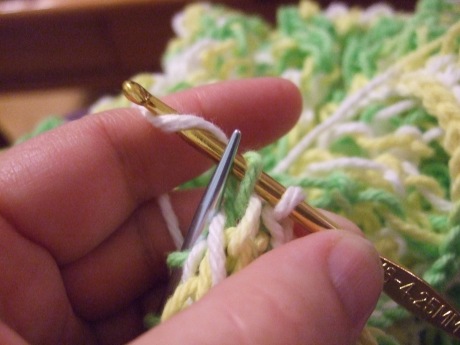
pull a loop through both loops on your hook.

Continue moving one stitch at a time from your needle to your hook, and slip stitching until you’ve gone all the way around the bag and have one loop left on your hook.

Using whichever method you like best, working in spiral or rounds, single crochet 2 rows.

Now, lay your bag flat on a table, and find the center stitches  on the top layer and the bottom layer. 

Now, place markers 7 stitches on either side of the two center stitches, leaving 14 stitches between the makers for your handles.

For the next round, SC in each stitch until you get to the first marker.  Chain 20.  Single crochet in stitch after the second maker, and in each stitch until you get to the third marker.  Chain 20, and Single crochet in the stitch after the 4th marker, and continue until the end of the round.

For the next two rounds, SC in each stitch, following up the (chain) handles .  Fasten off.

For the bottom, attach your working yarn in the corner, and work a slip stitch into the front and back cast-on stitches of the initial round, and continue until the bottom is sealed.  Finish off.

For the flower, I used the same yarn and Lucy’s flower pattern, and attached it to where my rounds met.

I hope this pattern makes sense to you.  I love this bag and hope that you will too!


ScrapFusion(tm)

I started doing regular scrapbooking when my mom lived with us.  She was just in the beginning stages of alzheimer’s, and I was looking for an activity that we could do together that would keep her busy, keep her active, be creative, and exercise her memory.  Scrapbooking fit the bill perfectly.  We spent way too much money on our hobby, and scrapbooked every afternoon for years, until she was no longer able.  It was during this time that I started whining to my hubby, Doug, that the embellishments fell off of the pages after a week or a month, and that the glue was way too expensive.  He was a chemist for a large printer, and we worked together to develop a scrapbookers liquid glue, and thus ScrapFusion(tm) was born.

We receive lovely comments from scrapbookers, cardmakers, quillers, and altered art makers.  Colleen shared some cards with us that she made, and I’d love to post them here.  Thank you, Colleen for sharing and allowing me to post these pics!

Can you believe how detailed these are?  She used a Martha Steward punch for the branches.  I’m pretty sure that I wouldn’t have the patience to make these beauties!

Love the blue and white combo!!


This one, with the window, is so pretty!  Almost (almost, not quite, lol) makes me want winter!  I love the layering!


This card is just so stunning with the red background and the red berries.  I love the branches from other trees in the top corners!


I would love to make my own cards for Christmas…but who am I kidding?  I never seem to find time to send any cards!  Christmas always takes me by surprise.  I usually have one or two gifts made throughtout the year, then I don’t do anything until it’s panic time.  And wrapping?  Forget it!  Doug and I spend Christmas Eve and a good part of Christmas morning wrapping.  Maybe this year I’ll be organized!  Hey, if you’re gonna dream, dream big!

Oh, and did I mention that from now until the end of August, there is free shipping on ScrapFusion(tm)??? 

Finger Painting with Pinterest

Yesterday I putzed around the house.  I’m the type of person that thrives on crafting, and I was in my glory yesterday!  I knew that Grace was coming over for the day today, so I went through my boards on Pinterest to find something fun for her to do.  I came across the recipe to make fingerpaints, and that sounded quite do-able.  The recipe called for food coloring, but I was worried that it would stain, so I went to Walmart and bought washable tempra paint.  I made the fingerpaint base, divided it into thirds, and added some of the tempra paint to each bowl. I didn’t have squeeze bottles, so I stored it in old yogurt containers in the fridge.  I also bought an inexpensive 6 muffin tin that will be dedicated to Grace’s projects.  Today, while stuck in the house (105 degree heat index out there!), I put Grace in her booster seat, put an old t-shirt of mine on her, and put down a big sheet of paper.  I then put a glob of the 3 colors of paint in the muffin tin, and showed her to stick  her finger in and go.    It sure didn’t take long before she took off and created her own masterpiece!  I gave her a toilet paper roll, piece of an egg carton and a mini spatula  for some variation.  She loved putting the paint inside of the roll with the spatula!

Grace spent half an hour creating her masterpieces and had a blast.  I, of course, snapped photos and loved watching her!

And for the record, the paint washed up like a dream!  Here’s the final pic of Grace loving her painting…